Because matte painting often involves combining several photos to achieve an end-result, matte paintings can be great practice for anyone who wants to learn how to create photo manipulations. In this tutorial, we will show you how to create a fantasy city that is built on a rock structure, similar to Minas Tirith from "The Lord of the Rings." In the process, you will learn several techniques to help you incorporate architectural photos into your artwork. Let's get started!
Speed Art Video
Before you begin, watch this amazing speed art video that shows the entire process of creating this artwork.

Tutorial Assets
The following assets were used during the production of this tutorial. Please make sure to download them before you begin work. Often, third-party content is moved or deleted over time. If photos are not available, you will want to find alternative imagery before you start. Special thanks to Marcel Vijfwinkel for the use of his photography in this tutorial.
1. Cut Out Resources
Step 1
First, open one of the resource images. Let us start by cutting the sky out of our resource images so we can use them more easily later.


Step 2
Select the Magic Wand Tool.

Step 3
Click on the sky until you've selected all of it.


Be sure to check the tool settings to improve your selection. I've used these settings.


Step 4
Now let us go into Refine Edge to get a better selection.


Depending on the image you might want to play around with the Edge Dedection settings. Once the selection looks good just use the Delete key to get rid of the sky. It should look something like this.


Step 5
Now take the Rectangular Marquee Tool and select the part we need to keep.


Step 6
Next, crop the image by going to Image/Crop.


Step 7
We can now save the image for later use. Saving it as a PNG file allows us to keep the transparency.


Step 8
The previous steps are applicable to all the images we need to cut out, but let's go through it again. Open up another resource image.


Step 9
Select the sky around the image.


Step 10
Be careful around more difficult areas such as trees. For these situations it is better to zoom in.


Step 11
Once we cut out the sky the image should look like this.


Step 12
Again, the Refine Edge option can be handy to enhance the selection.

Step 13
Now spend a little time repeating the previous process to all the images we are going to need. Once we have all of our cut out architecture as PNG files we can move on to the next part of the tutorial.


2. Building Our City
Step 1
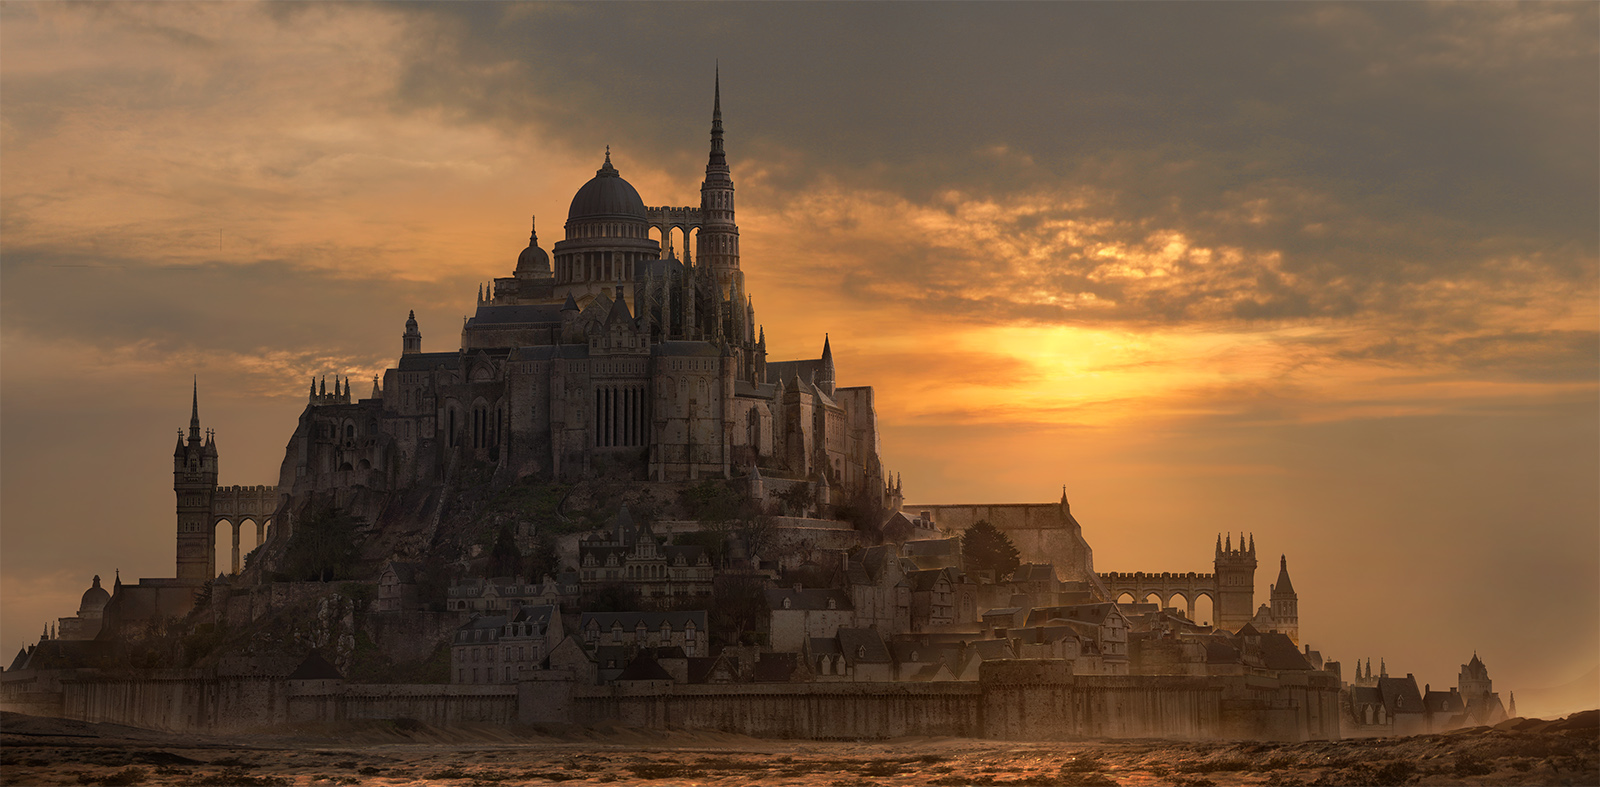
Now we can start the real work; building our fantasy city. First, open our main image of Mont Saint-Michel, which we will use as a base for our city. We can work on this image, it should be large enough. If your computer is a bit slow however you might want to reduce the size of the image.


Step 2
Use the Polygonal Lasso Tool to select one of the towers.

Step 3
Copy it and move it over to another part of the image to add more towers. You can add as many as you like.


Step 4
Now select the Rectangular Marquee Tool.

Step 5
Select a chunk of a building and use it to cover up other parts of the image. You can also use the Spot Healing Brush Tool and Clone Stamp Tool.


We want to get rid of anything that looks modern or unwanted such as metal scaffolding, tourists, modern shop signs, etc... A well patched up image should look something like this.

Comparing the original to the edited version shows how unwanted elements have been removed. Don't worry about the cars for now, we will take care of them later.


Step 6
With the Polygonal Lasso Tool, select the main tower of our structure. Cut and paste it into a new layer, we will keep this for later.


Step 7
Open up our image of the dome from the St. Pauls Cathedral.


Step 8
Select the image and copy and paste it into our main file. We will keep all the new parts of architecture on a separate layer for easier use later.


Step 9
To match the contrast of the images lets go to Image/Adjustments/Levels. We want to play around with both input and output levels until it seems to match. We will do this with all future images we paste into our main composition.


Step 10
Duplicate our new layer, we're going to cover up the hole underneath the dome.

Step 11
Move the image down to close the hole.


Step 12
We want to chop up the top section of the dome a bit to make it less recognizable. Select a chunk and cut it out.


Let us keep the top part and move it down, reducing the height of the dome's spire.


Step 13
Open our second image with a dome.


Step 14
Copy and paste the image and scale it down using Free Transform.


Step 15
We will need to adjust the levels of the image again to match it.


Step 16
Now we'll select a chunk of a roof to use as a connection between our two domes. Copy it and move it over.


Step 17
To add some more detail, copy some of the smaller spires.


Step 18
Make two copies and flip one of them around so we have a total of four spires. Use Image/Transform/Flip Horizontal.


Step 19
Move it over to the side as shown in the image.


Step 20
We can use another copy to add more spires to other parts of our city. Anything that takes it away from the original photo helps.


Step 21
Select a piece of railing from a rooftop to add more detail to our newly added images. Cut off any unwanted bits.


Step 22
Bring up our tower that we previously cut off the image.


Step 23
Select the three arches.


Step 24
Move a copy over to the main structure holding the top of our city. We're going to use it to add some detail.


Step 25
We'll need more arches so scale it down a bit and add another copy next to it.


Step 26
Select the part below the arches and copy it a few times. Then stack these copies to create the illusion that the arches are running deep down the wall.


Step 27
We can apply the same technique to add more arches to other walls.


Step 28
Next we're going to add some large walls. Select a piece of an empty wall from one of the houses.


Step 29
Make a few duplicates so we can have a bigger wall.


Step 30
To mix it up a bit we can use other parts of walls as well.

Step 31
Place and transform these pieces on our wall pieces. You can use the Eraser Tool to get rid of any unwanted seams.


Now we have a couple of nice looking structures that expand our city.


Step 32
Open up the image that has our cut out towers of the London Tower Bridge.


Step 33
Paste it and scale it to match the scale of our city. A good reference is to look at the size of the windows or bricks.


Step 34
Once again we need to match the lighting and contrast a bit before proceeding.


Step 35
To change the architecture of the iconic tower, let us do some cutting and pasting to change it a bit. Play around with scaling, copying and rotating.


Step 36
Once we're happy we can start building a bridge to connect the tower to the main structure of our city. Open up the image of our beautiful castle in Belgium.


Step 37
When zooming in, we can see the entrance gate makes a great piece of a bridge. Select it and copy it into our main composition.


Step 38
With a few copies we can tessellate the gate to make it look like a bridge.


Step 39
Select, copy and paste a suitable chunk of our main city to use as a support pillar for our bridge. If necessary, use multiple copies until the pillar reaches the ground level.


Step 40
We still have our original tower. Select the top spire.


Step 41
Move the spire over to our new tower. By changing the top of the roof we are altering the look of the iconic building.


Step 42
Open up another one of our resource images and select the right tower.


Step 43
Place it into the city at the correct scale.


Step 44
We can also add a copy of our tower and bridge to this side of the city. To match the perspective we can flip it around horizontally.


Step 45
Cut off the top of the tower.


Step 46
Use a copy of our previously created four spires to decorate the tower.


Step 47
Select a chunk of our round tower, we'll use it to build another tower at the top of the city.


Step 48
With a couple of copies we can make the tower a lot higher.


Step 49
Select one half of the tower and use a flipped copy to widen the base.


Step 50
Make the tower even higher with another copy. Also add a copy of the spire of our original tower to make the entire thing look like a giant needle. Don't forget to fix any lighting or contrast issues.


Step 51
Use another copy of our bridge to connect the tower to the main dome.


Step 52
We've used a lot of different architecture from different periods. To make this less noticeable we can copy features to other parts of our image. Select one of the windows of our spire tower.

Step 53
Use copies of this window to match the look of the spire tower to that of our main dome.


Step 54
The city is looking good. Let's finish up with adjusting the base outer wall. Select a large portion of the wall and use a flipped version to fill in the other side.


Step 55
To close the remaining gap in the middle, select and copy another piece of the wall. Erase out any seams you might find. However since the source material matches so well you do not have to be that precise.


3. Background & Lighting
Step 1
Now it's time to place our creation into a nice background and finish up the image. Open up one of our sky resources and place it behind the structure.


Step 2
The image doesn't cover the entire background. Just select parts and stretch them out to fill the frame.


Step 3
Open up our image of the Nevada desert and place it in front of our city.


Step 4
We're going to use masks to reveal parts of our image. Add a Layer Mask and use the Brush Tool with colors black to cover areas and white to reveal them. We can use a standard round brush for this.


This is a good time to cover the cars that were parked in front of the original structure, or any other unwanted elements in the foreground.


Step 5
The scene needs to be correctly lit so we'll adjust our layers so that the back layer is the lightest and the front one the darkest. Since the sun is coming from the back, this makes sense.


Step 6
I've changed my mind about the sky. Let's open the new sky and place it in our scene the same way we did before. The dim light of this sky seems to better fit our scene.


Step 7
Add a new layer and set the transfer mode to Linear Dodge. Place the layer between the foreground and our city, we're going to paint some dust kicking up to show more depth.

Step 8
We'll use the same standard round brush and a color that is already found in our scene such as a dark brown or grey. Now just paint simple bits of smoke and dust as shown in the images.


Step 9
Copy our foreground layer and set the transfer mode to Color Dodge. Add another mask to it and paint in where the sunlight would hit the ground. Keep it subtle and think about where the sun would lit the ground and where we'd have shade from the enourmous city.


Step 10
Now set the transfer mode of your brush to Linear Dodge. Until now we've kept all of our added architectural elements seperate, now we can use this to paint dust and light at the bottom and help seperate the layers.


Step 11
Copy our city layer and set the transfer mode to Linear Dodge. Add a black mask to make the new layer invisible for now.

Step 12
Select parts of the structure where the sunlight would hit. Keep it subtle, we can leave most of the city in the dark.


We can use the same brush as earlier now to just paint into the selection. This technique will give as nice crisp edges. Use a white brush to paint into your mask, revealing our previously added layer.


Step 13
The composition of our image is a bit too central. Move the city a bit to the left and paste in another one of our image resources. We'll use this to add some structures outside the city walls. Be sure that everything stays in scale.


Step 14
Let's also take some less fancy looking buildings from our main city and copy those.


Step 15
One piece of the building is enough so let's cut it out and match the lighting with the rest of the scene.


Below you can see the result of copying some more elements. Add as many as you like. You can always move the city more to the left if you need space for more buildings.


Step 16
We're nearly done, we just need to paint in some spilling sunlight to give all of it a nice glowing touch. Create a new Linear Dodge layer. Then pick a nice warm tone to paint our sunlight with. Experiment with less or more saturation.


Step 17
Our final step is to paint in the sun and light around the scene. We're using the same simple round brush. Try finding a balance between too much and too little.


Conclusion
In this tutorial, we learned how to cut and paste parts of photos and match them to create great looking structures. Remember to always keep scale and perspective in mind and to match the lighting and colors of all your elements. When you're done, remember to use a bit of Photoshop's great lighting capabilities to give everything that slightly magical touch. Have fun!