
In this tutorial, I'll help you make your first HTML5 game that is controlled by a Leap Motion Controller, using the Kiwi.js engine. (In case you haven't heard of it, Kiwi.js is a relatively new game engine that targets HTML5, WebGL, and JavaScript.)
After hearing about the Leap Motion Controller, I knew I had to get my hands on one. It's a computer hardware sensor device that supports hand and finger motions as input, requiring no hand contact or touching.
I saw this as a new frontier to gaming not yet fully explored. How could I pass up on an opportunity this exciting? After my controller arrived, and I'd spent the next few days playing with all of the apps on the Airspace store, I decided that I wanted to take it further and make my own games with it.
Getting Ready
To follow this tutorial, you will need a text editor and a browser. I use Sublime Text 2, and I prefer Google Chrome for its extensive developer tools, but the workflow will be pretty much the same with whichever text editor and browser you choose.
You’re also going to need a copy of Kiwi.js, the Kiwi.js Leap Motion Controller Plugin, and a Leap Motion Controller. To help us get started we’ll use a Kiwi.js game blueprint; blueprints are templates that speed up game creation by including all the initial non-game-specific setup (such as creating folder structures). You should download the Getting Started blueprint from the Kiwi.JS site.
Once you have downloaded the blueprint, you should be able to navigate to the plugin folder located inside it. Once there, you will need to extract the Leap Motion Controller plugin
to the plugins folder.
Loading Assets Into the Game
In the Getting Started blueprint, you will notice that inside the states folder, located inside the src folder, there are three JavaScript files. These contain the main states that we will need to run this particular Kiwi.js game.
A State in Kiwi.js is the main class that we use when wanting to create a game. States are used to keep different sections of a game separated; a single game may be composed of many different States. This means we can only ever have a single State active at a given time.
The blueprint has separated the Kiwi.js game into three states for us: the Loading State, the Intro State, and the Play State.
Inside the Loading State, we need to load our assets into the game. Since we are making a basic game to start off with will will not be loading many assets. The game we will make will simply give visual feedback on the position of your hand and fingers, represented by dots.
For this example, we'll use the two assets below. (Don’t worry, these graphics aren't meant to be pretty!)


The green dot will be used to show the
position of your hand in the game, and the red dot will be used to show the position of each finger, so I have named them hand.png and finger.png, respectively. Save them under these names in the img folder inside the assets folder.
To load these assets into the game, you will have to add them to the game’s cache
via the preload() method of LoadingState, which is found in the States folder, in the file named loading.js, like so:
1 |
GettingStarted.Loading.preload = function () { |
2 |
KiwiLoadingScreen.prototype.preload.call(this); |
3 |
|
4 |
this.addImage('hand', 'assets/img/finger.png'); |
5 |
this.addImage('finger', 'assets/img/hand.png'); |
6 |
};
|
Doing this means that we will be able to access and use the images from other States of the game, so let's start using them.
Creating Objects for the Controller and Sprites
To enable the Kiwi.js game to use the Leap Motion Controller, you need to create a controller object from the Leap Controller plugin.
First, we
need to include the Leap Controller Scripts in the
index.html file, like so:
1 |
<script type="text/javascript" src="plugins/LEAPController/LEAPController-0.1.3.js"></script> |
2 |
<script src="http://js.leapmotion.com/leap-0.6.0.js"></script> |
Second, we need
to make sure that the Game object knows we are using the Leap Controller
plugin.
The Game object is the engine of a Kiwi.js game; it handles the initialization of all the various individual game managers. To let the Game know we want it to use the Leap Motion Controller plugin, we need to edit its game options. This can be done by adding a line of code inside the game.js file that is located inside the src folder:
1 |
var gameOptions = { |
2 |
renderer: Kiwi.RENDERER_WEBGL, |
3 |
plugins:['LeapMotion'], //Add this line of code |
4 |
width: 800, |
5 |
height: 600 |
6 |
}
|
Now we are ready to create our controller object, by calling
the following line inside the init() method of the Play State, which you can find inside the states folder inside the play.js file. You will notice that the state does not yet have a init() method, so you will have to add this. For convenience, we'll call the Leap Controller object control:
1 |
GettingStarted.Play.init = function () { |
2 |
this.control = Kiwi.Plugins.LEAPController.createController(); |
3 |
}
|
Next, we'll create sprites that we can use to show
the position of our hand and fingers in the game—one "hand" sprite and five "finger" sprites, specifically. To do this, simply create a
Kiwi.GameObject.Sprite and add it to the state; the best place to do this is in the create method of the state.
In this snippet, we create the sprites and add them to the stage, then store them in the fingers array:
1 |
GettingStarted.Play.create = function () { |
2 |
this.hand = new Kiwi.GameObjects.Sprite(this, this.textures['hand'], 0, 0); |
3 |
this.addChild(this.hand); |
4 |
this.fingers = []; |
5 |
for (var i = 0; i <= 5; i++) { |
6 |
var temp = new Kiwi.GameObjects.Sprite(this, this.textures['finger'], 0, 0); |
7 |
this.addChild(temp); |
8 |
this.fingers.push(temp); |
9 |
};
|
10 |
}
|
Using the Leap Motion Controller Object
Once the game has preloaded its assets and been created, the Play State update loop will start running. This is where all of the fun stuff you create
will happen!
In this case, we're going to move the sprites we just created to the positions of their corresponding hand and fingers, as detected by the Leap Motion Controller. This can be done easily by accessing various properties of the Leap Controller object:
-
hands[0].posXandhands[0].posYwill give you the x- and y-coordinates, in the vertical plane parallel to the Leap Motion Controller, of the first hand that the controller detects. -
hands[0].pointables[n].tipXandhands[0].pointables[n].tipYwill give you the x- and y-coordinates, in the same space, of the tip of the nth finger on that hand.
In the following snippet, you will see that I have centered the position of the hand and fingers by moving the x-position over by half of the stage width, reversing the y-position, and adding the height of the stage to the y-position:
1 |
GettingStarted.Play.update = function() { |
2 |
Kiwi.State.prototype.update.call(this); |
3 |
|
4 |
this.hand.x = this.control.hands[0].posX + (game.stage.width * 0.5); |
5 |
this.hand.y = -this.control.hands[0].posY + (game.stage.height); |
6 |
|
7 |
for (var i = this.fingers.length - 1; i >= 0; i--) { |
8 |
this.fingers[i].x = this.control.hands[0].pointables[i].tipX; |
9 |
this.fingers[i].x += game.stage.width * 0.5; |
10 |
|
11 |
this.fingers[i].y = -this.control.hands[0].pointables[i].tipY; |
12 |
this.fingers[i].y += game.stage.height; |
13 |
};
|
14 |
};
|
Check out the example below to see what we have made!
With the example above you will be able to start to see how fast and accurate the Leap Motion Controller is with Kiwi.js. Also, with the Leap Motion Controller's tracking capabilities, you can quickly see how you are able to manage multiple interactions with just one hand.
Below is a list or values that the Leap Motion Controller plugin currently tracks for Kiwi.js:
-
Active Fingers: This indicates how many fingers the controller can detect. It can be found via the
pointables.activeproperty. -
Active Hands: This indicates the current number of hands that the controller can detect.
It can be found with the
hands.activeproperty. - The current hand's x-, y-, and z-coordinates, relative to the controller. This can be done by accessing the
posX,posY, andposZvalues of the hand object, as we've seen. - The orientation of the hand: the roll, the pitch, and the yaw. These are taken from the normal vector of the palm of the hand—that is, the vector that points outward from the surface of your palm.
This is also time to look the range at which the Leap Motion controller can track your hand. You will notice that the controller does have limitations to it's tracking range, as represented by the image below.


So you are probably thinking, "What happens when my hand leaves this range?" Well, the Leap Controller instantly notices that your hand is no longer visible and sets the active property of the hand to false. It also saves all of the data of the last known position of your hand until your hand becomes visible again.
Going One Step Further
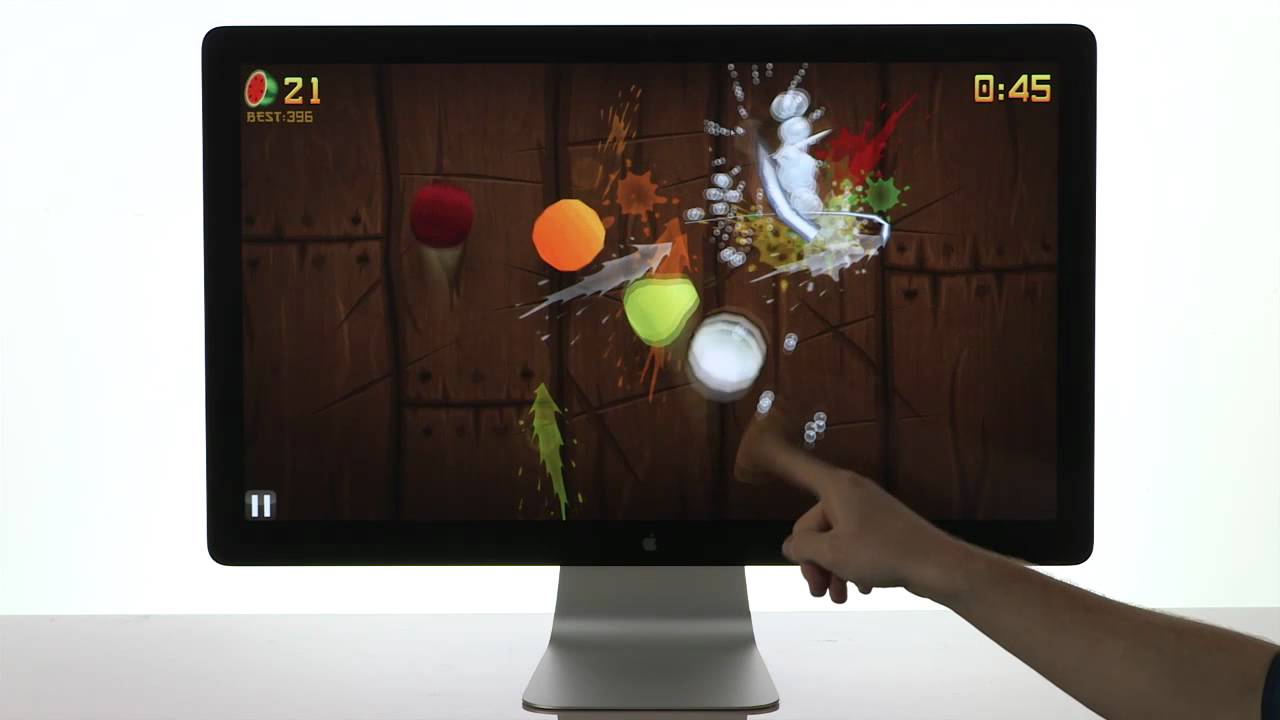
So far we have only made a basic demo, which may be cool to experiment with, but isn't exactly fun. Next, let's make an actual game like the one shown below:
Loading
Assets
In this game, we will animate some sprites. I have created a "FlappyNyan" sprite sheet that I will use for the this tutorial, along with some colored blocks which will be used for the color trail that FlappyNyan leaves behind. You are welcome to use these assets. Just grab them from the tutorial's GitHub repo.
Creating Classes
Instead of using the standard Sprite GameObject, we will want
to create a new class that extends Sprite. The purpose of this
class is to assist in creating the color trail of the cat. If you wanted to
further your game, you could implement arcade physics into the class, allowing for simple collision detection, and giving access to properties such
as velocity and acceleration.
To create a class you will need to create a separate JS file
in the entities folder; call it Nyan.js. You will
also need to include this script in your index.html file, in the same way as the plugin scripts:
1 |
<script type="text/javascript" src="src/entities/FlappyNyan.js"></script> |
Within this file, create a FlappyNyan class that has an animation of six frames:
1 |
var FlappyNyan = function(state, x, y){ |
2 |
Kiwi.GameObjects.Sprite.call(this, state, state.textures['FlappyNyanCat'], x, y); |
3 |
this.state = state; |
4 |
this.animation.add('walk', [0, 1, 2, 3, 4, 5], 0.1, true); |
5 |
this.animation.play('walk'); |
6 |
|
7 |
FlappyNyan.prototype.update = function(){ |
8 |
Kiwi.GameObjects.Sprite.prototype.update.call(this); |
9 |
}
|
10 |
}
|
11 |
Kiwi.extend(FlappyNyan,Kiwi.GameObjects.Sprite); |
Next, we want to create the FlappyNyan’s trail. To do this, we will continuously spawn boxes that will look like what FlappyNyan always leaves behind: a glorious rainbow of colour.
For this, I have created another class, called MovingBox. This class simply creates a box of
a certain color, moves left until it is off the screen, and then removes itself from the game:
1 |
var MovingBox = function(state, x, y, texture){ |
2 |
Kiwi.GameObjects.StaticImage.call(this, state, state.textures[texture], x, y, false); |
3 |
this.physics = this.components.add(new Kiwi.Components.ArcadePhysics(this, this.box)); |
4 |
|
5 |
this.xVelo = -200; |
6 |
this.yVelo = 0; |
7 |
this.physics.velocity.x = this.xVelo; |
8 |
this.physics.velocity.y = this.yVelo; |
9 |
|
10 |
MovingBox.prototype.update = function(){ |
11 |
Kiwi.GameObjects.StaticImage.prototype.update.call(this); |
12 |
this.physics.update(); |
13 |
if (this.x < -50) { |
14 |
this.destroy(); |
15 |
}
|
16 |
}
|
17 |
}
|
18 |
Kiwi.extend(MovingBox,Kiwi.GameObjects.StaticImage); |
Remember to include the MovingBox class in the index.html page.
Using Classes
Now you might be wondering how to use these boxes—let's tackle that next. These boxes that will be following FlappyNyan will represent the number of active fingers (that is, fingers that the Leap Motion Controller can see).
Since we want the boxes to follow the FlappyNyan object, we will
create a method to spawn these boxes inside the FlappyNyan class.
To do this, all you need to do is add this method to the
FlappyNyan class:
1 |
FlappyNyan.prototype.spawnBoxes = function(one, two, three, four, five){ |
2 |
|
3 |
if(one){ |
4 |
this.state.streamerGroup.addChild(new MovingBox(this.state, this.x , this.y + 05, 'yellowBox')); |
5 |
}
|
6 |
if(two){ |
7 |
this.state.streamerGroup.addChild(new MovingBox(this.state, this.x , this.y+ 15, 'orangeBox')); |
8 |
}
|
9 |
|
10 |
if(three){ |
11 |
this.state.streamerGroup.addChild(new MovingBox(this.state, this.x , this.y + 25, 'greenBox')); |
12 |
}
|
13 |
|
14 |
if(four){ |
15 |
this.state.streamerGroup.addChild(new MovingBox(this.state, this.x, this.y + 35, 'pinkBox')); |
16 |
}
|
17 |
|
18 |
if(five){ |
19 |
this.state.streamerGroup.addChild(new MovingBox(this.state, this.x, this.y + 45, 'blueBox')); |
20 |
}
|
21 |
}
|
Since we want to create these boxes every frame, add the spawn method to the update loop of the FlappyNyan class:
1 |
this.spawnBoxes(this.state.control.hands[0].pointables[0].active, this.state.control.hands[0].pointables[1].active, |
2 |
this.state.control.hands[0].pointables[2].active, |
3 |
this.state.control.hands[0].pointables[3].active, |
4 |
this.state.control.hands[0].pointables[4].active); |
Now that we have set up the two classes we need, all we need
to do now is create a FlappyNyan object in the Create() method of the Play State, and add
a Kiwi.Group to store the boxes in, then add these to the stage.
1 |
this.streamerGroup = new Kiwi.Group(this); |
2 |
this.addChild(this.streamerGroup); |
3 |
this.flappyNyan = new flappyNyan(this, 100, 100); |
4 |
this.addChild(this.flappyNyan); |
Once this is done we want to update its position, just as we have done for the hand object in the previous game.
1 |
this.flappyNyan.x = this.control.hands[0].posX + game.stage.width * 0.5; |
2 |
this.flappyNyan.y = -this.control.hands[0].posY + game.stage.height; |
And that’s it! You should now have a game where you are controlling a FlappyNyan!
If you have any questions, feel free to ask. You can find all of the source code and assets in the tutorial's GitHub repo.


