


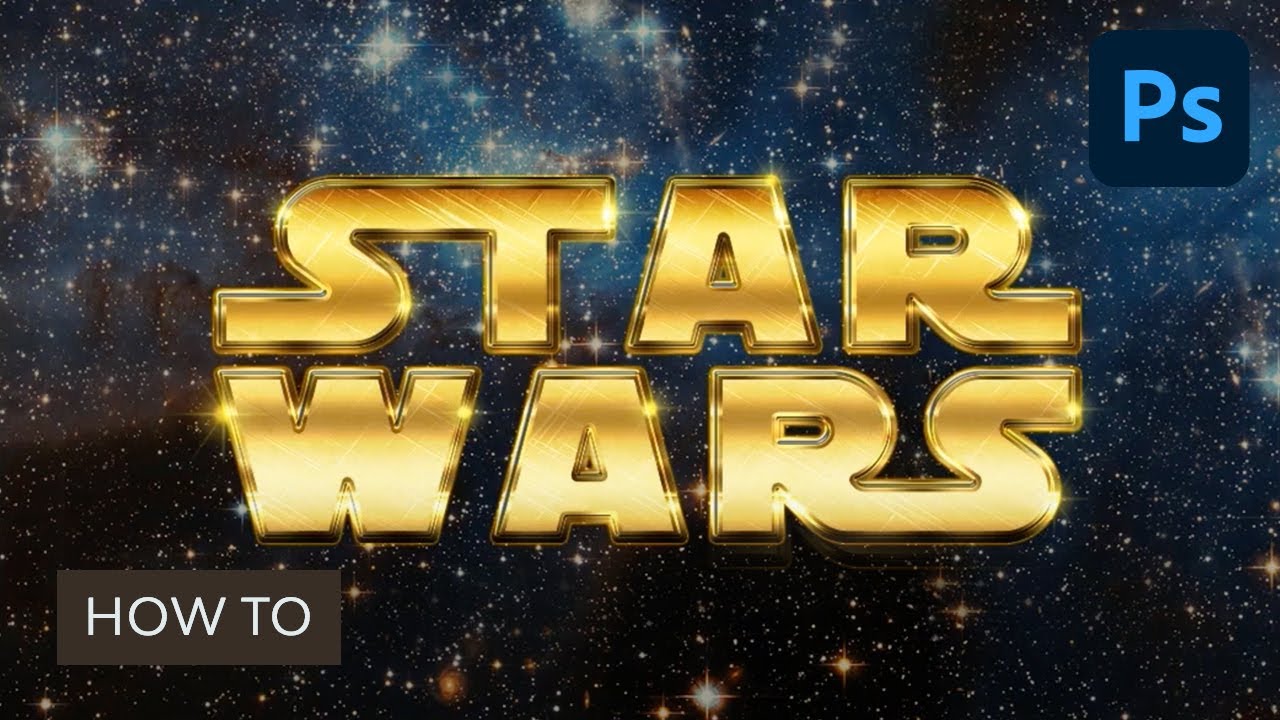
In this tutorial I will show you how to use a couple of layer styles, with a nice space texture and a flare brush tip, to create a Star Wars inspired text effect. Let's get started!
What You Will Learn in This Adobe Photoshop Text Effect Tutorial
- How to create a retro sci-fi font
- How to use different combinations of layer styles to achieve the vintage sci-fi font effect
- How to combine different textures used for sci-fi fonts
- How to adjust gradient effects
- How to use a special effects brush to create flares
Follow along with us over on our Envato Tuts+ YouTube channel:
Tutorial Assets
The following assets were used during the production of this tutorial:
- SF Distant Galaxy font
- we own the sky by mediumanalog
- 8 Tileable Metal Textures by WebTreatsETC
- Stars and Flares Brush Set by MysticEmma
- Free Pack 6000 photoshop gradients by Supertuts007 (Load the DIALS.grd and CHROMES.grd files)
1. Creating the Background
Step 1
Create a new 950 x 550 px document. Place the we own the sky image on top of the Background layer, and resize it as needed.


Step 2
Double click the texture image's layer to apply a Color Overlay effect. Change the Blend Mode to Multiply and the Color to #a6a6a6.


Step 3
This will darken up the image a little bit. Click the Create new fill or adjustment layer icon at the bottom of the Layers panel and choose Solid Color.


Step 4
Use the color #fced82, and then change the adjustment layer's Blend Mode to Multiply and its Opacity to 25%.


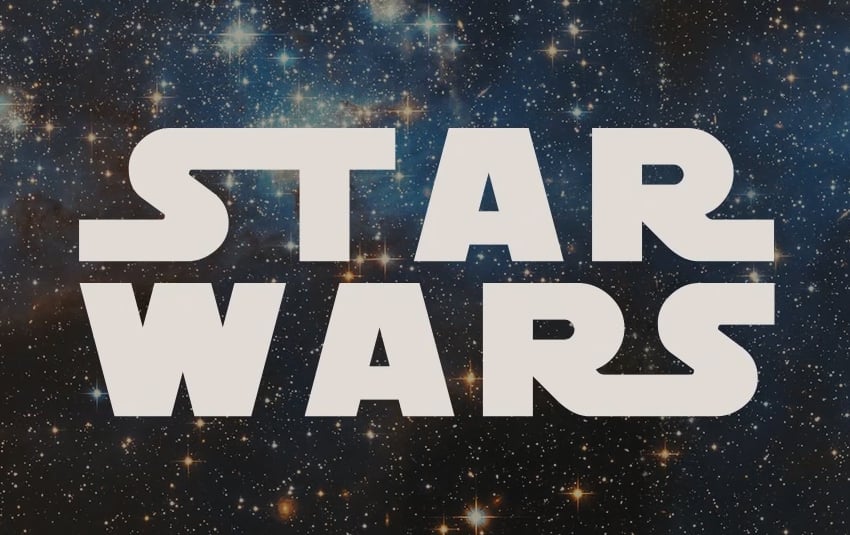
2. Creating the Text
Step 1
Create the text using the font SF Distant Galaxy. The S and T letters, at the beginning and the end of the text, are in uppercase.
Open the Character panel (Window > Character) to change some of the settings. The color is #f2ece6, the Size is 200 pt, the Leading is 155 pt, and the Tracking is set to 50.


Step 2
Next, we need to adjust the Kerning values for some of the letters. So you'll need to click once between each pair of letters, and type in a value that you like.
The values used here are:
- ST: -50
- AR (in both words): 50
- RS: -50


3. Adjusting the Text's Shape
Step 1
Once you like how the text looks, go to Type > Convert to Shape.


Step 2
Pick the Direct Selection Tool, and click and drag to select the two anchor points at the end of the top R letter.


Step 3
Press the Right Arrow Key to nudge those points to the right until they are aligned with the S letter below them.


Step 4
Select the top S letter's left anchor points, and press the Left Arrow Key to align them with the W letter below them.


Step 5
Duplicate the shape layer, change the copy's Fill value to 0, and duplicate it once more.


4. Styling the Original Shape Layer
Double click the original shape layer to apply the following layer style:
Step 1
Add a Bevel and Emboss with these settings:
- Style: Stroke Emboss
- Size: 3
- Gloss Contour: Gaussian - Inverse
- Check the Anti-aliased box
- Highlight Mode: Vivid Light


Step 2
Add a Contour with these settings:
- Contour: Rolling Slope - Descending
- Check the Anti-aliased box


Step 3
Add a Stroke with these settings:
- Size: 10
- Position: Center
- Fill Type: Gradient
- Style: Reflected
- Angle: 35
- Use the Golden Dial Top X11 gradient fill, and then click the Gradient box to edit it.
You'll need to double click each light Color Stop, and use the color #e1ca71 instead of #f5e5a6.


Step 4
Add an Inner Shadow with these settings:
- Opacity: 50%
- Distance: 0
- Size: 1


Step 5
Add a Gradient Overlay with these settings:
- Click the Gradient box to create the gradient.


Step 6
You can click below the Gradient bar to add Color Stops, and for each Color Stop you have, you can click it and then change its Color and Location values.
You can also click the Opacity Stops on top of the Gradient bar to adjust their Opacity and Location values.
The values used from left to right are:
Color - Location
-
#ede1b1- 5% -
#ecd98f- 75% -
#e1ca71- 88% -
#be8936- 100%
Finally, change the left Opacity Stop's Location value to 5%.


This will create the first layer of stroke and the main text's fill.


5. Styling the First Copy Text Layer
Double click the first copy shape layer to apply the following layer style:
Step 1
Add a Stroke with these settings:
- Size: 10
- Position: Center
- Blend Mode: Overlay
- Fill Type: Gradient
- Style: Reflected
- Angle: 90
- Use the faucet 110 gradient fill


Step 2
Add a Gradient Overlay with these settings:
- Blend Mode: Hard Light
- Check the Reverse box
- Use the Gold Dial Tops X7 - angled gradient fill
You can now click and drag the gradient inside the text to reposition it as you like.


Step 3
Add a Pattern Overlay with these settings:
- Blend Mode: Overlay
- Pattern: metal_6-512px.jpg


This will intensify the stroke and fill colors.


6. Styling the Second Copy Text Layer
Double click the second copy shape layer to apply the following layer style:
Step 1
Add a Bevel and Emboss with these settings:
- Style: Stroke Emboss
- Size: 3
- Gloss Contour: Ring
- Check the Anti-aliased box
- Highlight Mode: Vivid Light


Step 2
Add a Contour with these settings:
- Contour: Cove - Deep
- Check the Anti-aliased box


Step 3
Add a Stroke with these settings:
- Size: 10
- Position: Center
- Blend Mode: Overlay
- Fill Type: Gradient
- Style: Reflected
- Angle: 5
- Use the Golden Dial Top X11 gradient fill


This will add one more layer of coloring to make the effect more vivid.


7. Adding an Outer Glow
Step 1
Duplicate the second copy shape layer, and then right click it and choose Rasterize Layer Style.
Rename the rasterized layer to Glow, and change its Fill value to 0.


Step 2
Double click the Glow layer to apply an Outer Glow effect using the following values:
- Blend Mode: Linear Light
-
Color:
#e7bf2a - Size: 3


This will add a subtle outer glow to the text.


8. Adding the Flares
Step 1
Set the Foreground color to #ead994, pick the Brush Tool, and pick the S&F-12 tip from the Stars and Flares Brush Set.


Step 2
Open the Brush panel (Window > Brush), and modify the settings under the Shape Dynamics tab as shown below:


Step 3
Reduce the brush tip's Size to a value you like, create a new layer on top of all layers, call it Flares, and change its Blend Mode to Linear Light.
Then, start clicking to add flares around the text edges.


Congratulations! You're Done


In this tutorial, we used a space texture as a background, and modified its coloring using layer styles and adjustment layers.
Then, we created the text, and modified some of its settings such as the Tracking and Kerning values.
We converted the text into a shape, and worked some more on its letters' ends. Once we were done, we created a couple of copies, and styled each one of them to achieve the effect.
Finally, we modified a flare brush tip, and used it to add some flares and sparkles to the text's edges.
Please feel free to leave your comments, suggestions, and outcomes below.
Learn More Star Wars Related Art Techniques
If you liked this tutorial and are looking to create more Star Wars inspired art, check out the tutorials below! Expand your expertise by going through these in-depth guides. Happy designing!


